Chocolate Sheet Cake

20 mins prep
30 mins cook
50 mins total
Easy
(50 reviews)
Chocolate Sheet Cake

Description

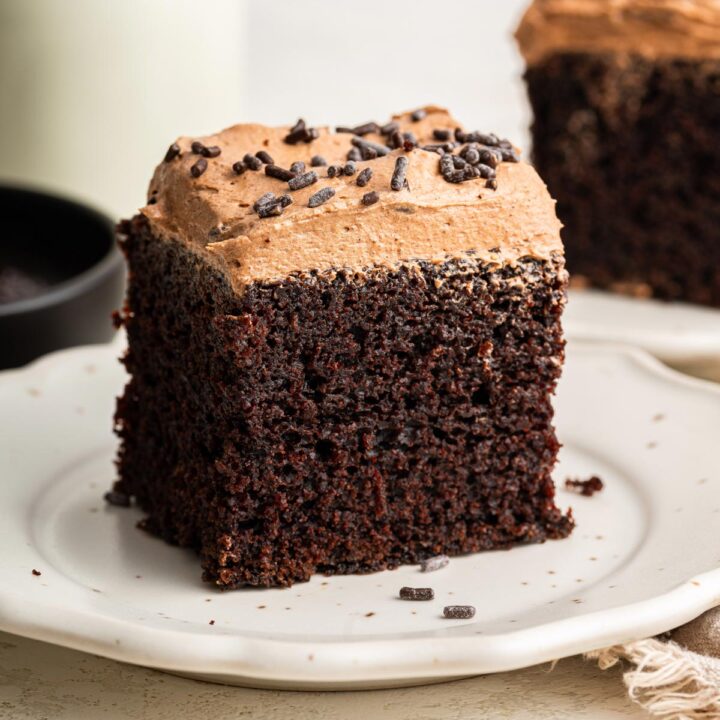
This incredible chocolate cake recipe is just as easy to make as a boxed cake mix. It’s crazy moist and super delicious. The luscious chocolate frosting is silky-smooth and creamy.

Ingredients
  • 1 3/4 cups (228g) all purpose flour
  • 2 cups (400g) granulated sugar
  • 3/4 cup (85g) natural unsweetened cocoa powder
  • 2 1/4 tsp baking soda
  • 1/2 tsp baking powder
  • 1 teaspoon salt
  • 1 cup (240ml) milk
  • 1/2 cup (120ml) vegetable oil
  • 1 1/2 teaspoon vanilla extract
  • 2 large eggs
  • 1 cup (240ml) hot water
  • 1 cup (227g) unsalted butter
  • 4 cups (500g) powdered sugar
  • 4-6 tablespoons milk or cream
  • 1/2 cup (57g) natural unsweetened cocoa powder
  • 1 teaspoon vanilla extract
  • Sprinkles

Instructions

  1. Preheat oven to 350F and grease a 9×13″ baking pan with non-stick baking spray or butter.

  2. In a large bowl, whisk together the flour, sugar, cocoa powder, baking soda, baking powder and salt. Set aside.

  3. In a medium bowl, whisk together the milk, vegetable oil, vanilla and eggs.

  4. Add the wet ingredients to the dry ingredients and mix until combined with a rubber spatula.

  5. Add in the hot water and whisk until smooth.

  6. Pour into the prepared baking pan and bake for 30-32 minutes or until a toothpick inserted into the center comes out with a few moist crumbs.

  7. Let cool completely before frosting.

  8. Using a handheld or stand mixer, beat the butter for 1 minute until creamy. Mix in 1 cup of powder sugar and with 1 tbsp of milk/cream at a time, mixing well in between.

  9. Mix in the cocoa powder and vanilla until smooth. Add more milk/cream if necessary for a spreadable consistency.

Nutrition Information

Per serving

307
Calories
47g
Carbs
3g
Protein
14g
Fat
6g
Saturated Fat
0g
Trans Fat
35mg
Cholestrol
222mg
Sodium
106mg
Potassium
2g
Fiber
37g
Sugar
277IU
Vitamin A
33mg
Calcium
1mg
Iron

Tags

Dessert Chocolate Easy Family Favorite Best for Birthday

Blueberry Heaven on Earth Cake

30 mins prep
4 hrs wait
4 hrs 30 mins total
Medium
(206 reviews)
Blueberry Heaven on Earth Cake

Description

This blueberry heaven on earth cake truly lives up to its name, featuring moist cake, a delightful homemade blueberry pie filling, two luscious creams, and toasted almonds to top it off!

Ingredients
  • 240g (1 cup) whole milk 3% fat
  • 50g (1/4 cups) granulated sugar
  • 40g egg yolk
  • 12g (1 1/2 tablespoon) corn starch
  • 12g (1 1/2 tablespoon) all purpose flour
  • 1 teaspoon vanilla extract
  • 28g (2 tablespoons) unsalted butter
  • 115g (1/2 cups) heavy cream
  • 230g (1 cup) heavy cream
  • 75g (1/3 cups) mascarpone
  • 30g (1/4 cups) powdered sugar
  • 1/2 teaspoon vanilla extract
  • 600g (21 ounce) blueberry pie filling
  • 400g (14 ounce) angel food cake
  • Toasted almond slivers

Instructions

Luxurious Vanilla Cream Layer

  1. Whisk the sugar and egg yolks until fluffy, then mix in the cornstarch, flour, and vanilla until you get a smooth paste.

  2. Heat the milk until simmering, then slowly pour it over the egg mixture while whisking vigorously. Return the mixture to the saucepan and cook for a few minutes until thickened.

  3. Gradually stir in the softened butter until fully incorporated. The pastry cream needs to completely cool before folding the heavy cream in. Cover it with plastic wrap to prevent skin from forming.

  4. Once cooled, whisk the pastry cream for 1-2 minutes to get a smooth texture. Make sure you do not over-whisk it, as it can get runny. Give it a few whisks only until smooth.

  5. Whip the very cold heavy cream to soft peaks. Gently fold the whipped cream into the pastry cream in three stages, mixing carefully after each addition. Refrigerate your vanilla cream layer while preparing the rest of the layers.

Chantilly Whipped Cream Layer

  1. Using an electric hand mixer, whip the very cold heavy cream, mascarpone, and sifted powdered sugar for about a minute, then add the vanilla extract.

  2. Continue whipping for 2 to 3 minutes, or until the cream reaches a fluffy, pipeable consistency (after soft peaks but before stiff peaks). Be sure to stop whipping right away to avoid over-beating. If you continue, the chantilly cream will separate and become runny.

Blueberry Layer

  1. Open a tin of blueberry pie filling can or prepare it from scratch using my recipe.

Assembly

  1. Layer the Blueberry Heaven on Earth cake from the bottom to top (1/2 blueberry filling layer minus three tablespoons that will go to the top, 1/2 vanilla layer, whipped cream layer and the three tablespoons of blueberry pie filling swirled into it). Make sure to spread the layers evenly in the pan, smoothing each level with an offset spatula before adding the next.

  2. Refrigerate for 4 hours for the cake to set. Just before serving, add some toasted almond slivers on top.

  3. Store leftovers in an airtight container in the refrigerator for up to 2 days.

Nutrition Information

Per serving

366
Calories
52g
Carbs
5g
Protein
17g
Fat
10g
Saturated Fat
0g
Trans Fat
82mg
Cholestrol
197mg
Sodium
166mg
Potassium
1g
Fiber
35g
Sugar
1mg
Vitamin C
660IU
Vitamin A
99mg
Calcium
1mg
Iron

Tags

Dessert Blueberry Sweet Party

Boston Cream Poke Cake

20 mins prep
30 mins cook
50 mins total
Easy
(22 reviews)
Boston Cream Poke Cake

Description

This Boston cream poke cake is a fun variation of a Boston cream pie. Made with boxed cake and instant pudding mixes, this super easy dessert is sure to be a hit with family and friends.

Ingredients
  • 1 (15.25 ounce) package yellow cake mix
  • 1 cup water
  • 3 large eggs
  • 1/4 cup vegetable oil
  • 4 cups milk
  • 2 (3.5 ounce) packages instant vanilla pudding mix
  • 2 cups semisweet chocolate chips
  • 1 cup heavy whipping cream

Instructions

  1. Preheat the oven to 350 degrees F (175 degrees C). Grease a 9x13-inch pan.

  2. Beat cake mix, water, eggs, and oil in a large bowl with an electric mixer until combined. Pour batter into the prepared pan.

  3. Bake in the preheated oven until a toothpick inserted into the center comes out clean, about 30 minutes. Let cool for 15 to 30 minutes.

  4. Whisk milk and pudding mix together in a bowl until just starting to thicken. Poke holes all over cake with the handle of a wooden spoon. Pour pudding mixture over cake, and spread over entire surface to fill the holes. Refrigerate until firm, about 1 hour.

  5. When the cake is almost firm, place chocolate chips into a glass bowl.

  6. Heat cream in a small saucepan over medium-low heat, stirring frequently, until bubbles form, about 3 minutes. Pour hot cream over chocolate chips (whisk until smooth).

  7. Spread ganache over cake.

Nutrition Information

Per serving

386
Calories
49g
Carbs
5g
Protein
20g
Fat
9g
Saturated Fat
0g
Trans Fat
57mg
Cholestrol
399mg
Sodium
214mg
Potassium
2g
Fiber
35g
Sugar
0mg
Vitamin C
131mg
Calcium
1mg
Iron

Tags

Dessert Boston Chocolate Easy Family Favorite

Italian Lemon Ricotta Cake

12 mins prep
55 mins cook
1 hr 7 mins total
Medium
(301 reviews)
Italian Lemon Ricotta Cake

Description

This Italian Lemon Ricotta Cake is light, fluffy, and full of flavor. Made with ricotta cheese and fresh lemon, you're going to love this traditional Italian dessert that's also great served as a breakfast or brunch treat.

Ingredients
  • 3/4 cup butter, softened 1 1/2 sticks
  • 1 1/2 cups sugar
  • 15 ounces whole milk ricotta cheese
  • 3 large eggs
  • 1 teaspoon vanilla
  • 1 large lemon, zested and juiced
  • 1/2 teaspoon baking soda
  • 1/2 teaspoon salt
  • 1 1/2 cups flour
  • Powdered sugar for dusting top of cake

Instructions

  1. Preheat oven to 350 degrees. Grease a 9 inch springform pan using butter and powdered sugar, set aside.

  2. In a large mixing bowl or stand up mixer, cream together the butter and sugar until combined. Add in the ricotta cheese and blend until light and fluffy, about 4 to 5 minutes.

  3. Mix in the eggs, one at a time. Add in the vanilla, lemon zest, and lemon juice and mix to combine. In the same bowl, stir in the baking soda and salt. Lastly, add in the flour and mix until just combined, scraping down the sides of bowl to full incorporate all of the ingredients.

  4. Pour the batter into the prepared springform pan. Bake for 45-55 minutes, or until the cake is set and a toothpick inserted in the middle of the cake comes out clean.

  5. Let cool in pan for 15 minutes before removing the collar and base of the pan. Cool on a wire rack and dust with powdered sugar before serving.

Nutrition Information

Per serving

501
Calories
57g
Carbs
11g
Protein
26g
Fat
16g
Saturated Fat
1g
Trans Fat
134mg
Cholestrol
285mg
Sodium
1g
Fiber
38g
Sugar
2mg
Iron
2mg
Vitamin C
858IU
Vitamin A

Tags

Cake Lemon Ricotta Lemony Flavor Easy Family Favorite

Limoncello Tiramisu

25 mins prep
4 hrs cooling time
4 hrs 25 mins total
Medium
(198 reviews)
Limoncello Tiramisu

Description

Limoncello Tiramisu is a simple make-ahead Italian dessert made with Limoncello liqueur, mascarpone cheese, and ladyfinger cookies. This is a deliciously lemony version of classic Italian tiramisu and can be made up to two days in advance.

Ingredients
  • 2 cups mascarpone cheese
  • 1/4 cup Lemon Curd
  • 1/4 cup Limoncello
  • 1 lemon, zested and juiced
  • 2 cups heavy whipping cream
  • 1/3 cup powdered sugar
  • 3/4 cup sugar
  • 4 lemons, zested and juiced
  • 1/2 cup Lemon Curd
  • 1 tablespoon Limoncello (optional)

Instructions

  1. In a large bowl using a handheld mixer, beat together the mascarpone, 1/4 cup lemon curd, 1/4 cup Limoncello, and the juice and zest of one lemon. Set aside.

  2. In another bowl using a handheld mixer, beat together the heavy whipping cream and powdered sugar until mixture thickens into peaks.

  3. Use a rubber spatula to gently fold the whipped cream mixture into the mascarpone mixture, set aside.

  4. To make the soak, bring sugar and the juice and zest of four lemons to a boil. Reduce to a simmer and cook for 2 minutes. Turn off the heat and pour in 1/2 cup Limoncello.

  5. To assemble, take the ladyfingers and quickly dip them in the soak mixture, allowing them to soak up some the liquid. Repeat with half of the ladyfingers laying them to fit in the bottom of the baking pan, cutting to fit if necessary. (You will have leftover soak).

  6. Gently scoop on half of the mascarpone mixture and spread over the ladyfingers. Repeat the layers with the remaining soaked ladyfingers, ending with the other half of the mascarpone filling.

  7. To make the drizzle, thin out 1/4 cup of lemon curd with either a tablespoon of Limoncello, or remaining soak. Whisk and then carefully drizzle over top of the tiramisu.

  8. Cover and refrigerate for at least 4 hours or up to two days before serving.

Nutrition Information

Per serving

438
Calories
40g
Carbs
6g
Protein
26g
Fat
16g
Saturated Fat
0.01g
Trans Fat
82mg
Sodium
103mg
Potassium
1g
Fiber
22g
Sugars
976IU
Vitamin A
18mg
Vitamin C
80mg
Calcium

Strawberry Tiramisu

15 mins prep
12 hrs chill
12 hrs 15 total
Easy
(53 reviews)
Strawberry Tiramisu

Description

Strawberry Tiramisu is a delicious twist on the classic dessert. Made with no raw eggs, this is a simple and delicious treat to have on hand for any occasion.

Ingredients
  • 1 cup heavy whipping cream
  • 1/2 cup powdered sugar
  • 1 teaspoon vanilla
  • 8 ounces mascarpone cheese, softened
  • 1/2 cup strawberry jam, seedless
  • 1/4 cup Grand Marnier
  • 1/4 cup water
  • 1 package ladyfingers
  • 1 pound strawberries, sliced
  • Powdered sugar for sprinkling

Instructions

  1. In a large bowl, use a handheld mixer to beat the heavy cream, powdered sugar, and vanilla until stiff peaks form. Fold in the mascarpone and mix until well combined.

  2. In a separate bowl, whisk together the strawberry jam, Grand Marnier (if using), and water. Dip half of the ladyfingers in the mixture and arrange them in a single layer in the bottom of a 9 x 9 inch baking dish.

  3. Spoon half of the mascarpone mixture over the ladyfingers, spreading it evenly. Arrange half of the sliced strawberries on top of the mascarpone mixture.

  4. Repeat the layering process with another layer of dipped ladyfingers and finish with the mascarpone mixture. (Don't add the final layer of strawberries at this point). Cover dish with plastic wrap and refrigerate for at least 12 hours or up to 48 hours.

  5. Before serving, arrange the remaining half of the sliced strawberries on top of the tiramisu. Dust with powdered sugar.

Nutrition Information

Per serving

394
Calories
55.2g
Carbs
7.9g
Protein
7.9g
Fat
9.5g
Saturated Fat
0g
Trans Fat
79mg
Cholestrol
237mg
Sodium
315mg
Potassium
3.2g
Fiber
31.5g
Sugar
0.0mcg
Vitamin D
158mg
Calcium

Tags

Strawberry Tiramisu Sweet Easy Family Favorite

Oreo Tiramisu Trifle

15 mins prep
15 mins total
Easy
(210 reviews)
Oreo Tiramisu Trifle

Description

This dreamy, no-bake Oreo Tiramisu Trifle combines rich flavors with a delightful crunch, making it the perfect dessert for any occasion.

Ingredients
  • 20 cookies Oreo cookies, crushed
  • 1 cup heavy cream
  • 1/2 cup mascarpone cheese
  • 1/4 cup powdered sugar
  • 1 tablespoon vanilla extract
  • 1/2 cup brewed coffee, cooled
  • 1 tablespoon cocoa powder (for dusting)
  • 1/4 cup chocolate shavings (for garnish)

Instructions

  1. Whip the heavy cream in a mixing bowl until soft peaks form.

  2. Gently fold in the mascarpone cheese, powdered sugar, and vanilla extract until smooth and fluffy.

  3. Dip half of the crushed Oreos into the cooled coffee and layer them at the bottom of serving glasses.

  4. Spread a layer of the mascarpone mixture over the Oreos.

  5. Repeat the layering process, finishing with a layer of the cream mixture.

  6. Dust the top with cocoa powder and garnish with chocolate shavings.

  7. Refrigerate for at least 2 hours before serving.

Nutrition Information

Per serving

140
Calories
21g
Carbs
1g
Protein
6g
Fat
2g
Saturated Fat
0g
Trans Fat
0mg
Cholestrol
95mg
Sodium
40mg
Potassium
0.2g
Fiber
22g
Sugar
0mg
Calcium
1.2mg
Iron

Pumpkin Chai Tiramisu

20 mins prep
3 hrs cooling
3 hrs 20 mins total
Easy
(201 reviews)
Pumpkin Chai Tiramisu

Description

This Pumpkin Chai Tiramisu is a festive fall twist on a classic! Pumpkin pure is whipped into the cream mixture, with chai concentrate used instead of traditional espresso to dip the ladyfingers into. Optionally, you can add a little bit of spiced rum to the chai mixture for a boozy oomph of flavor. This is a great dessert to make for Thanksgiving or other holiday celebrations!

Ingredients
  • 1 cup heavy whipping cream
  • 1 cup pumpkin pure
  • 1/3 cup sugar
  • 2 tablespoons maple syrup
  • 8 oz mascarpone cheese
  • 81 cup chai concentrate
  • 2-4 tablespoons spiced rum
  • 2 tablespoons cocoa powder
  • 1 teaspoon pumpkin pie spice
  • 24 ladyfingers
  • Bittersweet chocolate

Instructions

  1. In a medium bowl, whip the 1 cup heavy whipping cream until soft peaks form. In another bowl, beat together the 1 cup pumpkin pure, 1/3 cup sugar, 2 tablespoons maple syrup, and 8 oz. mascarpone cheese until smooth and well combined. Fold the two mixtures together gently until combined.

  2. In a shallow bowl, mix together the 1 cup chai concentrate and 2-4 tablespoons spiced rum, if using. In a small bowl, mix together the 2 tablespoons cocoa powder and the 1 teaspoon pumpkin pie spice.

  3. Sift half of the cocoa powder the pumpkin pie spice mix onto the bottom of an 8×8-inch baking dish.

  4. Dip half of the 24 ladyfingers into the chai concentrate briefly (soaking for too long will result in a soggy texture). Place in a single layer, rounded-side-up, on top of the dusted baking dish. Feel free to break them in half to fit, if needed. Spread half of the pumpkin cream mixture on top. Repeat with the remaining ladyfingers, and the rest of the pumpkin cream mixture.

  5. Dust the top layer by sifting the remaining half of the cocoa powder and pumpkin pie spice mixture.

  6. For best results, cover with plastic wrap (or alternative) and refrigerate for at least 3-4 hours, but preferably overnight, or up to 48 hours. Before serving, dust with bittersweet chocolate shavings if desired. Cut into 9 slices (3 slices x3 slices in a square pan) and serve.

Nutrition Information

Per serving

371
Calories
32g
Carbs
6g
Protein
24g
Fat
14g
Saturated Fat
0g
Trans Fat
120mg
Cholestrol
67mg
Sodium
153mg
Potassium
2g
Fiber
12g
Sugar
1mg
Vitamin C
5142IU
Vitamin A
81mg
Calcium

Tags

Dessert Pumpkin Easy Everbody's Favorite

Panacotta

15 mins make
4 hrs 20 mins additional
4 hrs 35 mins total
Easy
(32 reviews)
Panacotta

Description

Panna Cotta is that wonderful Italian milk custard, quivering and wobbly with the promise of melting into a flood of creamy goodness in your mouth. Simple yet elegant, perfect for dinner parties.

Ingredients
  • 2 1/2 teaspoon gelatine powder
  • 1 1/2 cup milk
  • 1 1/2 teaspoon vanilla bean paste with seeds
  • 1/4 cup caster sugar
  • 1 pinch cooking salt/kosher salt
  • Oil spray

Instructions

  1. Pour the 1/2 cup of milk in a small saucepan, sprinkle the gelatine across the surface then whisk in. Leave for 5 minutes – the gelatine will swell and look curdled.

  2. Gently warm the gelatine mixture on medium low heat and stir until it melts and looks like lump-free milk again. Don't let it simmer.

  3. Add the milk, sugar, vanilla bean paste and pinch of salt. Heat just to let the milk warm and stir gently to dissolve the sugar. Don't let the milk simmer or even get steamy or frothy, just gently warm.Once the sugar is dissolved, remove from the heat and leave for 10 minutes to let the vanilla flavour to infuse.

  4. Stir in cream. Pour into a large jug or bowl, clear glass is best (so you can check for seed sinking later).

  5. Refrigerate uncovered for 1 hour, stirring at the 30 minute and 45 minute mark, scraping along the sides (in case it starts to set).

  6. After 1 hour, the mixture should be a pouring cream consistency. Stir, leave for 15 seconds then check the underside to ensure the vanilla beans aren't settling back on the base.

  7. Lightly oil spray 6 moulds (about 2/3 cup / 160ml each), then lightly wipe out excess. Divide mixture between moulds (if you spy lumps, strain).

  8. Refrigerate at least 6 hours, preferably overnight. (If not un-moulding, 4 hours is enough).

Turning Out Pannacotta

  1. Remove the Panna Cotta from the fridge. Run the tip of a small knife around the edge of the surface.

  2. Invert mould onto a plate. Grip the plate and mould with both hands and give it an assertive shake to loosen the Panna Cotta (it might take a few goes).

  3. Serve the Panna Cotta with additional few berries for color on top.

Nutrition Information

Per serving

253
Calories
13g
Carbs
5g
Protein
21g
Fat
13g
Saturated Fat
0g
Trans Fat
63mg
Cholestrol
46mg
Sodium
139mg
Potassium
0g
Fiber
13g
Sugar
0.3mg
Vitamin C
109mg
Calcium

Tags

Dessert Pudding Easy Everbody's Favorite

Profiteroles

30 mins prep
40 mins cook
1 hr 10 mins total
Easy
(220 reviews)
Profiteroles

Description

Crispy light-as-air pastry balls filled with custard or cream and topped with chocolate. There are few things in life as delightful as biting into one of these! Terrific lighter / finger food option for dessert.

Ingredients
  • 100g / 7 tablespoons unsalted butter
  • 1 cup water
  • 1 cup flour
  • 4 large eggs
  • Pinch of salt
  • Vanilla custard (Creme Patissiere)
  • Ice cream
  • 4 egg yolks
  • 1/4 cup white sugar
  • 3 1/2 tablespoons cornflour/cornstarch
  • 2 1/3 cups milk
  • 1/4 cup extra white sugar
  • 1 teaspoon vanilla bean paste
  • 250g/8oz dark chocolate
  • 1 cup cream

Instructions

  1. Place butter in a saucepan over medium heat. When mostly melted, add water then bring to a rapid simmer.

  2. While liquid is simmering, add flour and pinch of salt, and stir vigorously with a wooden spoon (still on stove) until the dough forms sort of a ball and pulls away from the sides of the saucepan. About 1 minute.

  3. Remove from heat and let mixture cool for 10 minutes.

  4. Preheat oven to 220°C/420°F (200°C fan).

  5. Lightly grease 2 large or 3 standard baking trays with butter, then line with paper. (Grease stops paper sliding)

  6. Add 1 egg into batter, beat until combined. Add remaining eggs one at a time making sure each is combined before adding the next. Dough should be like a thick paste.

  7. Place dough into a piping bag fitted with a 13 – 15mm round tip (1/2 – 3/5").

  8. Pipe 2 tsp blobs 5cm/2" apart (I do 16 on each tray). Makes 40 – 50 blobs.

  9. Wet your finger with water and pat down any peaks to form domes (for nice round balls).

  10. Bake 2 trays at a time for 15 minutes, switching the trays halfway.

  11. Remove from oven, reduce heat to 180°C/35°0F (160°C fan). They should be crispy enough that when pierced, they will not collapse – if not, return to oven for 3 minutes.

  12. Pierce balls with knife then return to oven for 5 – 7 minutes until golden and crispy.

  13. Transfer to rack, cool fully before filling with custard, cream or split then fill with ice cream. Drizzle with chocolate and serve!

Chocolate Topping

  1. Place cream and chocolate in a heatproof bowl. Microwave 4 x 30 seconds, stirring in between, until incorporated. Cool to warm, then use for drizzling or dipping.

Custard Topping

  1. Whisk yolks and sugar, then whisk in cornflour.

  2. Place milk, vanilla and extra sugar in a saucepan over medium high. Heat until just before simmering.

  3. Whisk in 1/4 cup hot milk into egg mixture. Whisk in another 1/4 cup. Then add remaining milk mixture and whisk.

  4. Pour back into saucepan. Return to stove on medium low (low for strong stoves). Whisk constantly 2 to 3 minutes until the mixture thicks to a thick dolloping custard consistency.

  5. Remove from heat immediately, pour into bowl. Press cling wrap onto surface (stops skin forming) then refrigerate for 4 to 5 hours until set. Do not whisk again once set (loses thickness).

  6. Spoon into piping bag fitting with a very fine nozzle. Then pipe into profiteroles (use the hole pierced during bake, or make a new hole).

Nutrition Information

Per serving

101
Calories
8g
Carbs
1g
Protein
6g
Fat
3g
Saturated Fat
0g
Trans Fat
42mg
Cholestrol
29mg
Sodium
60mg
Potassium
0g
Fiber
4g
Sugar
0.1mg
Vitamin C
26mg
Calcium

Tags

Dessert Profiteroles Pastry Easy Everbody's Favorite